


Learn how to make a short splice and an eye splice. Use short pieces of groundline to practice—you’ll soon see how straightforward it is.
- Open up about 10” of strands at each end of the two lines. Bring the ends together so the strands overlap, like interlaced fingers.
- To keep things tidy while you practice, tie a bit of thin twine around the loose strands of one line to hold them in place against the other.
- Now hold the left line in your left hand, with your hand covering the twine. Let the central strand rest on top of the line, while the other two hang down, one on each side. Using your right hand, pass the top strand under the nearest strand of the other line. Then pass the right strand under the next strand to the right, and finally pass the left strand under the strand to the left of where you started.
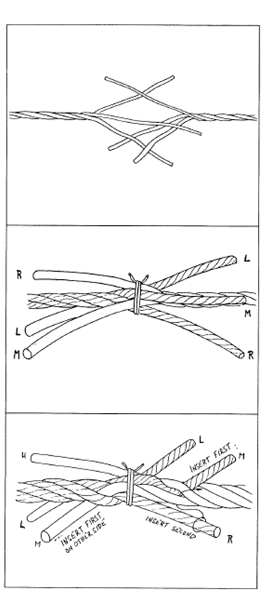
Making a short splice
Keep working the strands through the other line in the same order until each one has been passed through at least three times. After that, start tapering the splice by cutting off one strand and continuing with the other two. Then cut off another strand and finish by passing the last one through once more before trimming the end. Remove the twine and splice the other side in the same way. If you take a little twist out of the loose strands before tucking them in, the splice will look neater and run more smoothly through the sheaves.
For tarred groundline, it is enough to pass each strand through three times. For untreated or more slippery rope, you may want to pass each strand 6–8 times to be safe.
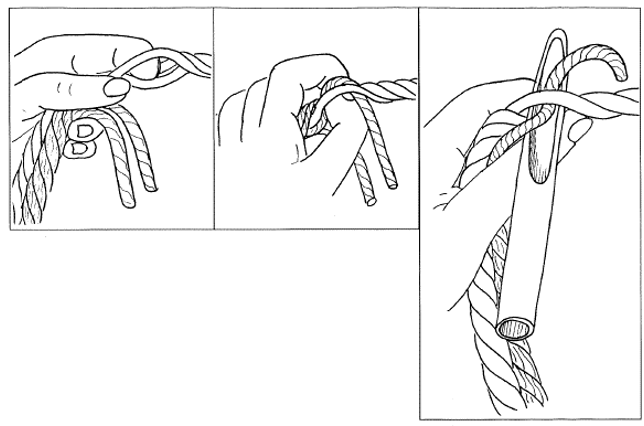
: Avoiding frayed ends during splicing
The ends of strands fray easily if you try to push them through the line, so always pull them through instead. To make this easier, you can use a hollow fid to open up the line, as this can stay in place while you pass the strand through. Splicing needles are also made for this purpose.
Do not bother taping the ends of groundline strands to stop them fraying – it will not help, and you just need to get used to working with them as they are. For heavier rope, though, some taping may be necessary. Wrapping PVC insulating tape around the ends of each strand is a quick and simple solution.

Using a constrictor to stop fraying
a. Start with a piece of thin twine, or a strand from a snood, and form it into a loop, counterclockwise.
b. Twist the right end half a turn toward you to make an S-shape with two loops. Move both ends so they lie under the loops.
c. Fold the right loop back so it rests alongside the left loop.
d. Slip both loops over the rope strands and pull tight.
e. This knot will not slip and will prevent fraying of any single strand or the whole rope.
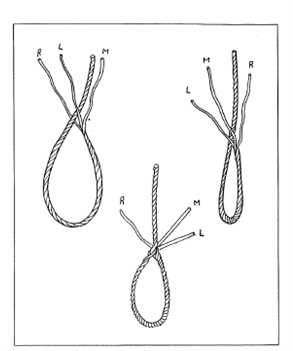
Making an eyesplice
An eye splice may also be useful and is made much like a short splice.
- First, open up about 10 inches of strands and form a loop (the eye) clockwise. Make the loop as big as you need.
- Hold the line in front of you with one loose strand on top and the other two hanging down on each side. Start by tucking the central strand under the nearest strand of the standing line.
- Next, tuck the right strand under the strand on the right, and the left strand under the strand on the left. To make the splice smoother, loosen the twist (lay) of the left strand slightly and tighten the twist of the right strand.
Always begin with the central strand, then follow with the right and left strands. All three should come out at the same level for a neat splice. If you get the first set of tucks right, the rest is straightforward. On tarred lines, tuck each strand at least five times. On untreated or slippery lines, tuck each strand 6–9 times for safety.